In this post, I will show you how to convert your colour images to black and white and sepia. I know you can set your camera to shoot in black and white mode or even sepia... However what happens is that you also lose the colour information. So why do you even need colour information for black and white? After reading this post, you will know and its all about control.
I know a lot of people hate black and white pictures, they would ask me; What happen to the colours? A friend even said that he hates reading books and magazine with black and white pictures. I was laughing inside... haha... Well I know photography is subjective and not all subjects are suitable for black and white, for example; a beautiful sunset with amazing saturated clouds, but hey, not all subjects are suitable in colour either.
Colour distract us from noticing the textures and tones. In addition, black and white is an alternative method to see things differently, normally our eyes can only see in colour but in pictures we can see them in colour or black and white and everything in between like sepia. Black and white also convey a sense of time. If an appropriate scene is chosen to convert into black and white, it can appear timeless, meaning, no one would know when the picture is taken, it can be in the past or not, who knows. Another benefit of black and white photographs is that they do not draw too much attention to our eyes when they are hung on walls, they blend in, harmoniously into the space.
It is very easy to convert pictures to black and white. You can do this without Photoshop. Heck if you are using Windows Vista, you can just double click the JPEG image and the image will open automatically in Windows Photo Gallery, then just click on the 'Fix' menu, then click on 'Adjust Colour' and finally move the saturation bar to the left, your pictures will become black and white. There... simple right?
However if you own photoshop, you can have much more control on how your black and white would appear in the final result but only if you have the colour image in the first place. So, this post is about how you can gain control in your end result of your black and white image.
There are many ways to do this is photoshop and the easiest way is to Desaturate which is similar to the process in Windows Photo Gallery. Photoshop just eliminates saturation from your pictures, making it black and white. (Click on Image, then move yout cursor to Adjustment, then finally click Desaturate or simply Shift + Ctrl + U)
Alternatively, you can select you image mode to Greyscale mode which is also very easy but again you have no control. Photoshop just discards away all the colour information, making it black and white. (Click on Image, then move your cursor to Mode, then select Greyscale)
If you are using Photoshop CS4, this is where the Black and White in the adjustment layer really shines. Our colour images are recorded in a combination of red, blue and green. So, this adjustment layer not only makes use of these three channels in Photoshop but yellow, cyan and magenta channels as well, giving you the ability to fine tune the final black and white output. This is really powerful stuff as I will now demonstrate. For comparison sake I will move each slider to the value of 200, so you can see the difference. Some are subtle but some are really drastic, so make sure you are careful with the adjustments. (Simply click on New Adjustments Layer situated at the bottom of the Photoshop pallete and then click on Black and White)
The original colour image
The black and white image with default settings
This is how the default Black and White slider looks like for the image
(Note: All the colour channel sliders are pretty much in the centre)
Original
The black and white image with adjusted red channel value to 200
This is how adjusted red channel slider looks like for the image
(Note: The red channel sliders are set to the value of 200)
Original
The black and white image with adjusted yellow channel value to 200
This is how adjusted yellow channel slider looks like for the image
(Note: The yellow channel sliders are set to the value of 200)
Original
The black and white image with adjusted green channel value to 200
This is how adjusted green channel slider looks like for the image
(Note: The green channel sliders are set to the value of 200)
Original
The black and white image with adjusted cyan channel value to 200
This is how adjusted cyan channel slider looks like for the image
(Note: The cyan channel sliders are set to the value of 200)
Original
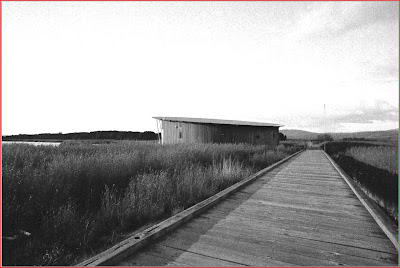
The black and white image with adjusted blue channel value to 200
This is how adjusted blue channel slider looks like for the image
(Note: The blue channel sliders are set to the value of 200)
Original
The black and white image with adjusted magenta channel value to 200
This is how adjusted magenta channel slider looks like for the image
(Note: The magenta channel sliders are set to the value of 200)
Can you spot the difference? With this information you can experiment to get better black and white results and the look that you are after, so don't be satisfied with default settings, get in control... if you like control that its...
Sometime, I want to make a picture appear nostalgic, giving it a sense of aging. This is when I make my pictures into sepia mode. Again, this can easily be done in the camera itself. But I like to control how it would look like in the end so here's how you can do it in Photoshop...
Just like before, after you have managed to convert your pictures into black and white, then simply add the colour balance layer. Now, simply move the top slider to the right to about the value of +20 and the bottom slider to the left to about the value of -30, leaving the center slider untouched. Your preferred setting may vary but the idea is you can adjust how sepia you want it to be...(Simply click on New Adjustments Layer situated at the bottom of the Photoshop pallete and then click on Colour Balance)
The original colour image
The sepia conversion
The Colour Balance adjustment slider
(Note: The Colour Balance adjustment layer must be on top of the Black and White adjustment layer as shown in the picture above)
Its all about control...
28 April 2010
27 April 2010
Visual Journey: Lowhead
I have recently been to Lowhead in Tasmania to try out what an orange filter does to black and white film photography. Supposedly it will darken blue skies and lighten foliage. I used the Bessa R4M on Kodak 400CN. Yes, it is true that you can do the same using digital and I will demonstrate this in my next post. However, you do lose some quality when you apply those filter if you shoot JPEG. So, my advice is to shoot RAW, more on that later.
Anyway, this post is about film Black and White, not digital. The beach we visited is normally deserted most of the time, untouched and serene as always has been. That's why I like it. Occasionally, surfers come here to surf.
Before we reached the beach, the weather was gloomy and it had rained a little, so I was not very hopeful of what I can get. However, when I reach the coast, the wind blew hard, and cleared the gloomy clouds and with the sun finally out, I set up my camera and took some shots.
This is what I got...and these are without the orange filter...
As you can see, the skies are already quite dark, without the filter. I am very happy with the look, without anything done in Photoshop except dust removal and cropping. I can never get such results using digital unless I use the red filter in Photoshop or other software like Nik Silver Efex Pro. Also, contrast always seem lacking in black and white digital files.
As I said earlier, I did try a few shots with orange filter and this is a comparison of before and after shots...
Without an orange filter
With an orange filter- You can see that, the skies are darker and the foliage is brighter or lighter in colour. A red filter on the other hand will make this even more pronounced but it may be too excessive. The effect you get from an orange filter looks just fine.
Here's another one with the orange filter...
With the skies darken, it makes the clouds stand out, great if you want to create drama in the clouds. I will show you how to do it in digital in my next post...Check back later...
24 April 2010
How to photograph the Moon
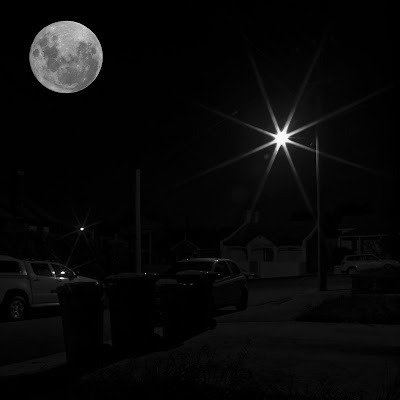
The moon in the image above is taken separately and can be used to add interest for your night photographs.
It is fairly easy to photograph the moon and if you google it you can just get the information you need. This post is meant to be a summary of the equipment you will need and the all the information there is to effectively shoot the moon.
The tutorial comes in 3 parts, the equipment, how to take the pictures and post processing.
1.....First of all, you need to have the following equipment:
a) A sturdy tripod.
This is a no-brainer, a tripod will ensure you can use ISO 100 with noise-free and blur-free images.
a) A 600mm reach telephoto lens.
This is the minimum requirement for me. It can be a prime lens or a zoom lens. You can even use a lens with a tele-converter to achieve the much needed reach. Of course the more the better, at 600mm reach you can already get phenomenal results, though 300mm is still quite usable.
When I previously mentioned 600mm, I meant it in 35mm full frame equivalent. So good news for those using crop sensor DSLR bodies, as you can get more reach by using the crop factor, such as the 70-300 for Nikon or Canon, at 300mm you get at least 450mm already in full frame equivalent. So, further adding a tele-converter can easily get you to the 600mm benchmark.
Olympus is special as their DSLR bodies sensor offer a crop factor of 2x, so when i use my 70-300mm, at 300mm I already get 600mm of reach, in full frame equivalent even without any tele-converters. I did not use a tele-converter, because the lens is not a very sharp one, so adding one will make the image quality suffer.
So, if you have to use a tele-converter, make sure your zoom lens is good enough like the 70-200 f2.8 for Nikon or Canon and use it in a crop sensor camera body. For the best results, use prime lens with a wide aperture, though they are huge and expensive. Food for thought....
That's all you need... A crop sensor camera body with a telephoto reach of 600mm...
2.....After you have the camera system, the next step is to actually take the photo.
a) Firstly, set up your camera on the tripod.
b) If you are using zoom, zoom out to the furthest.
c) Set your camera to manual, the camera's metering will be useless in this situation.
d)If you use the F/16 rule as stated in my previous post, you can set the aperture to F/16, ISO to ISO 100 and the shutter speed 1/100, your exposure should be just right to expose the moon properly. Of course, don't follow this blindly, use you camera's histogram to confirm the exposure. To confirm good exposure, make sure details of the moon surface is visible. Better still, bracket your shots, shoot at several frames at +/- 1 stops of exposure, then choose the right one later.
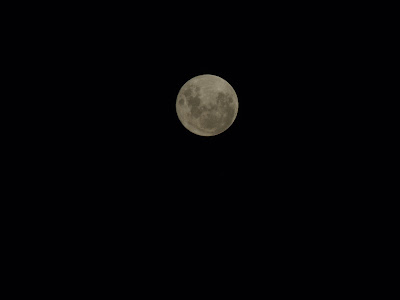
As you can see from the picture above, is you use the camera's Auto Exposure, there will be no detail on the moon. When this happen, underexpose more until the detail on the moon is revealed and the sky should be totally black.
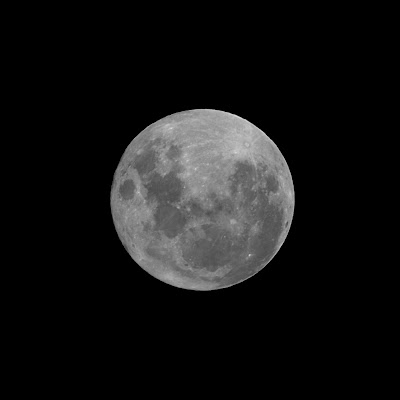
As you can see from the picture above, this is what good exposure of the moon should look like.
e) Focus manually. You will find that the camera will not be able to focus the moon properly. Use the zoom magnification focus assist to get the perfect focus.
f) Shoot RAW. This will ensure no details is lost when compressing the files they were shot in JPEG.
3.....Now for the post processing.
a) The first thing you should do is to crop the image.
b) Then, convert the picture into black and white. I would recommend you use the channel mixer in Photoshop to convert it to monochrome as you can adjust the red, green and blue to get the best black and white result.
c) Increase the contrast slightly to bring out the details on the moon.
d) Finally, just apply a little bit of sharpening, using unsharp mask in Photoshop.
Your end result should look like this:
21 April 2010
Visual Journey: East Coast of Tasmania
Tasmania is an island with great landscapes with sweeping vistas. The island is also home to many wildlife. I grabbed my film camera (Voigtlander Bessa R4M) and DSLR and went for a day trip to the eastern coast of Tasmania. There were three destinations and they were all the by the sea; Bicheno, Coles Bay and Swansea.
I brought my DSLR along, thinking I might encounter some wildlife, hence a long lens would prove to be useful, but at the same time I told myself to use only film in this trip. The truth is I did, I never pulled my DSLR out from my bag, even though I encountered some birds. My wife took the birds on my behalf on her Panasonic Lumix GF1... haha... This is something I have never done before, using film entirely on an outing.
Many things could have gone wrong, for example, if my film was not properly loaded, it will not advance properly and I would have wasted an entire roll of film, wasted my time and effort. The camera I'm using is fully manual, so the film has to be manually advanced for the next exposure.
Fortunately, nothing went wrong.
I brought 3 rolls of Ilford HP5 plus ISO 400 film for my black and white photos. I have never used them before but my research states that they provide vintage black and white look, meaning there will be some grain. For those who are wondering, the grain is totally different from digital grain which are not pleasant at all. I wanted to try it out on something worthy, so it makes sense to go out and shoot some landscapes and not waste it on shooting inside KMART... or my messy home/room... haha...
Now, let's get to the photos:
Its common to see sheep, cows or even horses grazing along the highway.
Destination: Bicheno and the area is also known as BLOW HOLE
This is why the place is called the BLOW HOLE, sea water can splash upwards caused by the cavity in the rocks.
Destination: Coles Bay
Destination: Swansea
And finally a picture of my wife posing on the beach... haha...
When I just received my prints today from the lab, some of the prints didn't turn up that well, they were a bit soft and the contrast were low, I just wasn't satisfied with the look, even though they were printed on Black and White paper, whatever that means. That's the thing, whatever that is captured on film, that's it, not much room for error, unless of course you print the pictures in the darkroom by yourselves, then you can chemically alter it a bit.
I decided to scan the negatives to see if there are any differences, and I found out they look better scanned on the monitor as I can correct whatever flaws on the negatives, dust, scratches, water mark, crooked horizons, brightness and even contrast to get the look I want. So most of them were keepers for me if they are scanned and digitally enhanced.
As for prints, I think I will just ask the labs to develop the negatives and I could just scan them after that. This is not only a much cheaper way, but I can correct whatever that need corrected. If I want prints, they will only be the best ones that are good enough worthy for enlargements. I have less prints but they are only the good ones. However, this way is also more time consuming because scanning takes a lot of time, not including the time to edit the pictures. But in the end, it's all worth it as I really like the film look of the Ilford film as it is so different from the clean and sterile look we get from digital files which seem to lack character even though they may have better resolution. Its a personal thing I guess... I will soon test some pro colour film. I have some Fujicolour Pro 400H yet to be tested, so come back for that...
Subscribe to:
Posts (Atom)